Whether you are in a real life wilderness survival situation or you are simply trying to hone your emergency preparation skills, knowing how to make a DIY water filter using only what you have to hand may not only save you from a stomach illness, but it can also go a long way towards saving your life.
If you want to survive in any tough situation, having clean drinking water is essential and in this guide, we will cover how you can create your own water filter using common materials.
Why You Need Water Filter
Our body comprises mostly of water. While you can go a few days without food, you can’t last long without water.
It may be relatively easy to find water in the wild, unless you’re trying to find it in a desert of course, but you cannot always be sure of the safety of drinking water taken directly from a lake, pond, or stream.
Even if your water source is in a remote location where contamination is unlikely it may still contain a lot of harmful substances including harmful bacteria and debris such as dirt and small insects.
That is why if you are not carrying a personal water filter, or any other type of water filter for that matter, you will need to make yourself one.
It may also be the case that you might not have the gear to purify your water after filtering such as water purification tablets, if so you will still need to find a way to boil it before even considering having a drink.
The basic function of water filter in a survival situation is to help eliminate debris such as dirt, soil, sticks, sediment, leaves, and small insects that live in the water. Please remember your DIY water filter will not remove harmful pathogens or microscopic parasites.
For this survival water filter, you will need to gather a few essential materials using your EDC knife (hopefully you have one!).
Here is a list of the items you are going to need for this wilderness DIY water filter.
- Birch bark (possibly!)
- Cordage (possibly a vine of some sort)
- Charcoal
- Gravel
- Stones
- Piece of cloth
Step 1: Gathering Material
First things first, you need a container of sorts in which to layer all your filtering materials into. If you have something like a plastic bottle to hand that’s great. However, should you be truly stuck out in the wilderness with only limited gear then you will need to improvise.
The harvested bark of a birch tree will be perfect for this job as it is both thin and flexible and is ideal for the task of making a filtration casing.
If you haven’t any birch trees in your location you will need to think outside the box a little but for this guide we will take it that there are birch trees nearby. How lucky are we!
To use birch bark for our filter, you will need to cut the bark into a semi-circle shape, around a foot in diameter. This shape will allow you to roll the bark into a funnel shape.
As previously mentioned, if you can find a plastic bottle then cutting off the bottom will provide you with the perfect container which already has a cone shaped bottom when turned upside down.
Okay, no bottle, so you have to go with the bark. However, you will need something that will keep the bark in the conical shape you need.
The second item you need is some extremely flexible cordage. This cordage will be used to tie the cone or funnel in shape. It should be about a foot in length and be paracord-thin. You could possibly use a thin strip of bark, cut and shaved thin enough to resemble a shoelace.
The third item is charcoal. Obviously the best charcoal to use is that which you buy from your local store. You’re in the wilderness, so there isn’t a whole lot of places close-by where you can purchase some high quality charcoal. You will need to make your own. Simply use lumps of charcoal/burnt wood from your campfire.This will be used to make the most important layer of your water filter.
The fourth and fifth items are gravel and stones. If you can find sand, even better, but if you are in a region where sand is not available, just collect handfuls of stones and gravel.
Last but not least, you will need a cloth, a small piece of clothing such as a bandana is perfect. If needs be you will have to cut a piece of cloth from a tee-shirt or a shirt you are wearing.
Step 2: Putting your DIY Water Filter Together
This type of survival filter is very easy to build. There are many different variations, some will use different materials for filtration such as grass and sand as well as, or in place of, the materials mentioned above. At the end of the day you will only be able to work with what you can find so keep that in mind as you read on.
Start with rolling the bark into a funnel shape and using your pocket knife, dig a hole through the intersecting part.
String the branch or bark strip that you gathered previously through the hole you have just poked on the overlapping bark, and tie off the end into a square knot.
Next, take your charcoal and place it in the center of the cloth. Bring all the corners of the cloth together so that the pieces of charcoal collect at the bottom. Now that the charcoal is completely covered, use your hand to crush them into fine particles. Place the cloth with powdered charcoal into the funnel and spread open the ends of the cloth so you can see the charcoal.
Starting with the finest gravel you can find, pile inside the funnel, and then followed by the larger stones. You can repeat these layers if you like and even introduce a sand layer if possible if you happen to find any. Your filter should be layered with your finest material at the bottom and the coarsest at the top. Your filter is now good to go!
This video shows how to put together a wilderness water filter and offers some good ideas not covered in this post. Please be warned, although the video is very informative the video creator does use the odd profanity!
Step 3: Finding Water to Filter
Now that you have a built your DIY water filter, it is now time to look for some water to filter. Remember water in survival situations is likely to be contaminated to certain degree.
In certain survival situations, it may be more difficult to find water. Here are some ways to collect water if you are unable to locate a lake, river, or stream.

This method may take a while to yield results, but if you want a steady supply of water, this is one of your best shots.
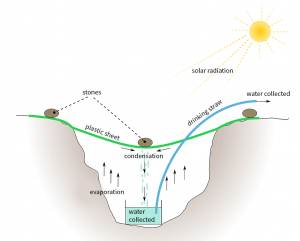
- Choose an area on the ground that gets constant sunlight
- Dig a hole in that area. Your hole should be deep enough to hold whatever water container you have. Place the container in the center of the hole making sure no dirt finds its way into it.
- Cover the hole using a plastic sheet to trap moisture evaporating from the ground.
- Put a small stone at the center of the plastic wrap just above the container to create a dip
- As the sun hits the ground, water evaporates from the soil. The vapors then rise, hitting the plastic sheet, they then condense back into water, as the water forms bigger droplets it will run towards the dip in the plastic and then drip into the container. This water is in purified form and there may not be a need to run it through your water filter unless some dirt fell inside the water container.
You can also place very green and bushy vegetation into the hole to increase the levels of evaporating moisture.
Collect Water Through Plant Perspiration

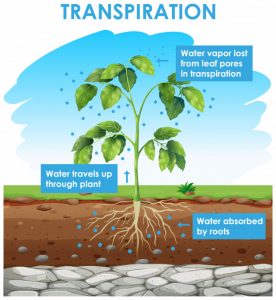
We just mentioned using vegetation in a solar still but alternatively you can collect the moisture from the same foliage with taking it from the plant.
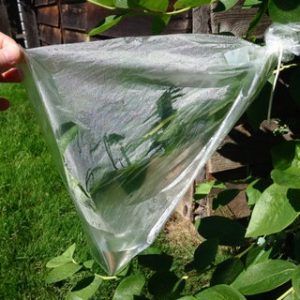
Find a plant with plenty of leaves and tie a plastic bag over a live and bushy branch. The plant will continually transpire, much the same as we perspire.
By sealing a bag over a bushy branch the water vapor the plant transpires will become trapped inside the bag and will then condense and run to the bottom of the plastic bag.

You also do not have to filter this water, but you may need to boil it.
Both these methods of collecting water are slow but effective however, the collected water will require boiling, but how do you boil water in a survival situation when you may not have any cookware?
It is simple.
You can boil water in a hole dug in the ground. For this exercise, you need to be in an area that has clay soil. The clay soil here will be used to line the hole you create in the ground to prevent water from leaking into the earth.
Dig two holes – one to get clay and the other for boiling water.
Take clay and mix it with a small amount of water so that you can smear it to the hole for boiling water. Be sure to seal off the dirt.
Pour water into the hole and start a fire alongside it.
Find dry rocks (note that wet rocks can explode in a fire). Roast a few rocks in the fire and when they are hot enough, put them into the hole using two sticks.
Soon, the water will start boiling!
Step 4: Finally
There are many other methods for making water filters in the wild but they all have the same principle of filtration. They all make use of different layers of different grade/size material.
You will find that the first process of filtration will yield water with gray tint due to the charcoal. But this can be fixed by further filtering or you can simply boil the grayish water so it is safe to drink.
Words of Caution
These methods of filtering water are only meant for survival situations, it is not advisable to use them if you are in or near civilization where there are alternatives.
DIY water filters are only good for removing dirt and other large materials from your water. They will not remove many microscopic parasites or pathogens, only purification through boiling or chemical treatment will do that.
If you have water filtration straws and water purification tablets use them!

